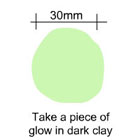
Step 1.
Take a piece of fluorescent clay (about 30mm size. Make a mould out of
it.
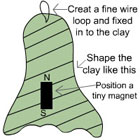
Step 2.
Next, make a shape of it as shown in the picture. Create a fine wire
loop. Fix it in to the clay. Then position a magnet in to the clay as
shown in the picture.
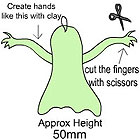
Step 3.
Create hands out of clay for the ghost. Take a pair of scissors or
scapula and with the help of it, cut out fingers as shown in the
picture. The Height should be approximately 50mm.
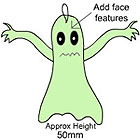
Step 4.
Finally, add some features to the mouth to give it a ghostly
impression.
When your ghost is ready, suspend it anywhere in your room. With the
help of a regular magnet you can move your ghost in any direction you
want. Rest is up to you. Use your imagination and scare the hell out
of your friends.
Making this cute ghost is nothing but a child's play. A short and simple craft for you.
You will need:
1) A white balloon
2) Scissors
3) 2 white plastic grocery bags
4) Tape
5) A black marker
Instructions:
Step 1: Cut the handles off the white plastic grocery bags. If there
are colored markings on the bags, cut them off too.
Step 2: Leave the seam at the bottom of the bags intact. Cut the bags
into strips.
Step 3: Blow up the white balloon.
Step 4: Tape the plastic bags around the end of the balloon (tape the
bags in a circle a few inches from one end of the balloon). If you
plan to hang the ghost up as a decoration, tape the plastic bags
around the plain end of the balloon, leaving the tied end exposed so
that you can tie a string to the top of the ghost.
Step 5: Using a black marker, draw two eyes and a mouth on the balloon.
Now you have a spooky ghost that can be used as a Halloween decoration
or as a toy (but not for very young children). As a Halloween
decoration, it is great. You can hang them at the top of the party
hall with the help of light strings and when the party heats up, you
can cut the strings and make the balloons fly. You'll see that the
ghosts fly really well.
An all-time Halloween favourite, this scary Halloween mask is simple to make.
You will need:
1) A paper plate
2) Crayons or markers. Tempera paint can also be used.
3) Scissors
4) Hole punch
5) Green yarn or elastic
Instructions:
Step 1: Grab the paper plate. On the backside, draw the face of a
jack-o'-lantern.
Step 2: Cut out the eyes, nose, and mouth from the drawing you've
made. Decorate the rest of the jack-o'lantern.
Step 3: Punch a hole on each side of the mask.
Step 4: Tie a length of green yarn (an elastic band may also be used)
to each hole of the jack-o'-lantern.
Did you know that you can easily create Halloween lanterns out of those old tin cans?
You will need:
1) Cans having a smooth surface (smooth surface accurately displays
your designs),
2) A hammer,
3) A nail.
Instructions?
Step 1: Use a nail to press very shallow points into the cans,
designing Halloween images like, a jack-o-lanterns, skulls, cats,
half-moons, and stars. If you don't want to do this free-hand, tape a
drawing onto the can.
Step 2: To make holes on the cans without denting the metal, fill the
can with water, and freeze it. Next, hammer simple designs into the
can with the nail. One or two good taps should do it, depending on the
size of the hole that you want.
Step 3: When your cans are complete, place tea lights or votive
candles inside to illuminate.
Step 4: Don't get scared yourself.
You will need:
1 -9 husky traditional chair leg (available at your local home
improvement store)
Black Ceram Coat Paint
Green Ceram Coat Paint
3 inch Felt Witch Hat
Orange paper twist
Spanish Moss
Orange cross-stitch thread
Silk Fall Leaf
Small Plastic Spider
3 1/2inch Black Buttons
Sponge brush
Hot glue gun
Black Pigma pen
Instructions:
1. Begin by removing the screw from the bottom of the chair leg. This
requires a fair amount of strength. Grip the screw
with a pair of pliers and twist the chair leg.
2. Paint the ball of the chair leg green. (This will be the head)
3. Paint the rest of the chair leg black.
4. Thread the orange cross-stitch string through the holes of one of
the buttons. Tie the thread off and repeat with the
other buttons.
5. Hot glue some Spanish moss to the back, top, and sides of the head.
6. Draw a face on the front of the head with the pigma pen.
7. Hot glue the buttons down the front of the witch's body.
8. Hot glue the hat to the top of the head. Embellish the hat by hot
gluing on the silk leaf and the plastic spider.
9. Untwist the paper twist and cut a thin strip. Tie a bow of the
paper twist at the witch's neck.
You will need:
Tootsie roll pops
6" squares of white fabric, with edges cut using pinking shears
6" lengths of black and orange ribbon, one for each "ghost"
10"x12" sheet of 2" thick Styrofoam
Black spray paint
Fine line Sharpie marker
Black acrylic paint & paint brush
Toothpicks
Paring knife, or other blade suitable to cut Styrofoam
Misc. small branch pieces (optional)
Instructions:
Of course the simple part is making the ghosts. Simply tie a square of
white fabric over the Tootsie roll, securing it at
the "neck" with a piece of ribbon tied in a bow.
The graveyard involves a couple steps that an adult should do - (1)
the cutting and (2) the spray painting. The rest of
it can easily be made by kids age 5 and up.
Cut the Styrofoam in half width-wise. Out of one half, draw off 3
tombstone shapes. Using a sharp knife or X-acto, cut
out these shapes, trimming it so that it is as smooth as possible.
Using 2 toothpicks each, secure the tombstones on top of the second
half of foam. Be sure to place these far enough apart
to allow room for other decorations.
Carefully "spritz" the whole display with black spray paint. Take care
not to spray for prolonged periods of time in any
one spot, as the spray paint will melt the foam. Just use quick, short
bursts of paint. Spray in this manner until you
have the look you want. Allow the paint to dry completely.
Now let the kids decorate the tombstones. Remove them from the base
foam. Let them use markers to write funny names, draw
cracks, and decorate them however they would like. If there are areas
that you would like to show more than others (such
as the names vs. the cracks) go over them with black paint.
Note: You will notice that the marker will melt the foam a little -
just encourage the kids not to press too hard.
When the tombstones are done, place them back on the foam base where
they were. You will see that a white blank was left
where the spray paint did not reach - this makes it easy to put them
back in place.
Have the kids gather interesting gnarly-looking twigs from the yard
and poke these in different spots around the
"graveyard. Finish off the masterpiece by poking the Sucker Ghosts
here and there.
You will need:
Ivy Bowl or Small Glass Fish Bowl
Orange CeramCoat Paint
White CeramCoat Paint
Yellow CeramCoat Paint
Blue CeramCoat Paint
Black Paint Pen
Kitchen Sponge
Miracle Sponge (Compressed sponge)
Q-tips
Instructions:
1. Using the kitchen sponge apply both colors of orange to completely
cover the glass bowl. All the pot to dry
completely.
2. Cut eyes, pupils, a nose and a tooth out of the miracle sponge. Dip
the miracle sponge in water so that it expands.
Squeeze out the excess water.
3. Sponge white eyes and a white tooth on the pot. Sponge a yellow
nose on the pot. If you do not like the coverage fill
in spots with a Q-tip. Once the eyes dry sponge blue pupils on them.
Let the paint dry. With a Q-tip add a sparkle of
white paint.
4. Draw around the eyes and nose with the black paint pen. Add a
mouth, pumpkin lines, and eyebrows with the black paint pen.
You will need:
1 bleach bottle
straw or raffia for the hair
12 by 12 flesh colored felt
12 by 12 black felt
glue
2 eyes (black felt, buttons, or googly eyes)
Tool to make small holes in plastic bottle
Wire
1/4 yard of black material
14 inches of black chenille
Instructions:
Step 1: Cut the bottle in half. Decide the size of face you want and
make a circle with a pencil.
Step 2: Make plenty of holes around the top of the circle.
Step 3: Cut the flesh felt in a circle and glue to the bottle.
Step 4: Now start inserting raffia into the holes, leaving 1 inch
hanging out of the upper holes and longer strands
hanging out of the side holes. String it in and out of each hole for
the hair line..
Step 5: Add on the eyes and mouth if you have one.
Step 6: Take the black material and make a triangle hat.
Step 7: Take the black felt and cover the back side of the bottle.
Stretch a piece of wire across the back so you can
hang it up. Attach the wire to each side real tight.
Step 8: Now you glue on the hat and glue on the black chenille for the
RIM of the hat.
The witch can stand by herself or hang on the wall or door.
You will need:
1. Long sleeved black T-shirt
2. Large sheet of card
3. Chalk fabric marker
4. Fabric paint (white)
5. Pot of water
6. Thick paintbrush
Instructions:
1. Insert card inside the T-shirt body and sleeves. Use the chalk
fabric marker to draw outlines of the shoulder blades, rib cage, spine
and hips on to front of the T-shirt. Draw outlines of the arm bones on
to both sleeves.
2. Use the thick brush to paint the bones on the front of the T-shirt
with white fabric paint. To make the bones really white, apply two
coats. Allow the paint to dry between coats.
3. To finish off, paint the bones on both sleeves. Leave the white
fabric paint to dry thoroughly between coats. All you have to do now,
is wait for the full Moon!
4. To repeat the design on to the back, allow the T-shirt to dry. Then
turn it over and repeat the steps 1, 2 and 3.
You will need:
Clear Plastic Tumblers
Craft knife
One 1 plastic-foam ball for each cup
Acrylic Paint: Rhythm Blue, Red, White & Black
One package Delta Freshly Fallen Snow
Instructions:
1. Cut ball in half.
2. Glue eyeballs to cup.
3. With black paint, make nose and mouth. Line with white paint.
4. Brush on Freshly Fallen snow onto the eyes. Let dry.
5. Paint the eyeball white, paint the iris Rhythm Blue and paint the
pupil black.
6. Paint red bloodshot eyes veins in the eyes.
Try out the other sections

 Craft Ideas for Kids
 Rhymes & Poems
 Benefits of Yoga for Kids
 School Projects & Homework Help