![]()
![]()

Scientist who study earthquakes are called seismologist. They have a variety of instruments to gather data. The Newton’s cradle experiment below explains how waves (tremors) work. The other project show two ways in which seismologist detect how the ground moves at the beginning of an earthquakes. A gravimeter measures small changes in gravity. The tiltmeter detects whether rock layers are tiltling.
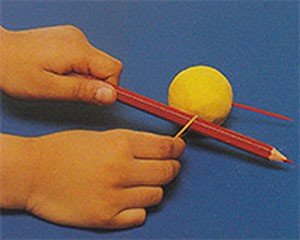
You will need: large beads, wool, tape, cane, four wooden blocks.
1. Tie the bids to the ends of the wool threads. Tape the other ends to the cane. Make sure the threads are all the same length, and that the beads all touch when they hang down.
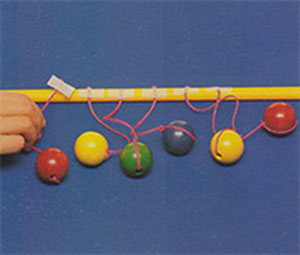
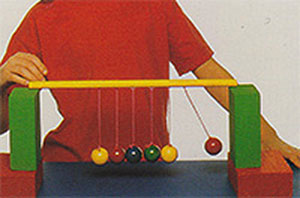
2. Prop up the cane at both ends on a pair of woodblocks supported by more blocks underneath. Secure the end of the cane with tape. Lift up the bead at one end of the row and let go.
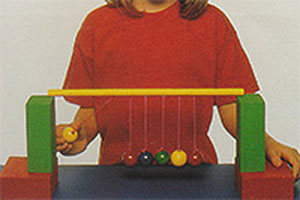
3. The bead at the other end flies up. The energy of the falling bead at the one end travels as a pressure wave through the middle ones. It reaches the bead at the other end and pushes it away.
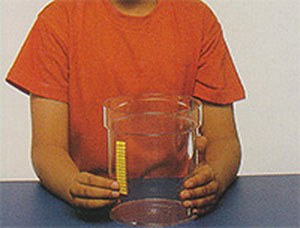
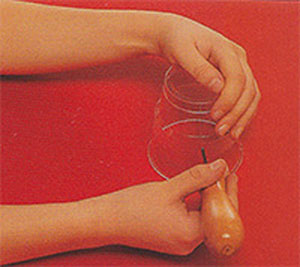
You will need: masking tape, ruler, pen, large jar, non hardening modelling material, rubber band, toothpick, pencil.
1. Draw a scale on a strip of a masking tape using a ruler and pen. Stick the scale on the jar. On a real instrument, this would measure slight changes in gravity.
2. Bury one end of a rubber band in a ball of a modelling material. Stick a toothpick in at right angles to the band, to acts as a pointer. Pass the pencil through the loop of the band.
3. Lower the ball into the jar, so that the pointer tip is close to the scale. Attach the pencil on top with modelling material. Move the jar up or down, and the pointer moves down or up the scale.

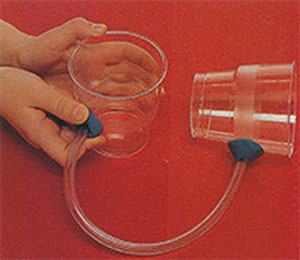
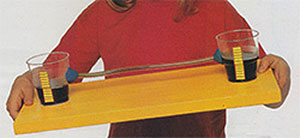
You will need: Hole punch, two transparent plastic cups, transparent plastic tubings, non-hardening modelling materials, pen, masking tape, ruler, wooden board, adhesive, food coloring, picher of water.
1. Use the hole punch to make a hole in the side of each plastic cup, just about halfway down. Be careful not to prick your fingers. Ask an adult to help you if you prefer.
2. Push one end of the tubing into the hole in one of the cups. Sal it tight it with modelling material. Put the other end in the hole in the other cup, and seal it as well.
3. Using the pen draw identical scales on two strip of the masking tape. Use ruler and mark regular spaces. Stick the scales at the same height on the side of the cups.
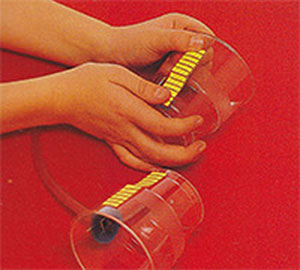
4. Stick the cups to the wooden baseboard with adhesive. Arrange them so that the tube between is pulled straight, but make sure it doesn’t pull out.
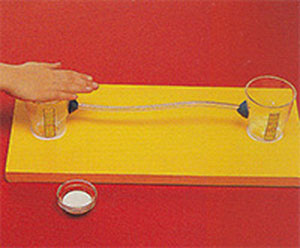
5. Add food coloring to water in the pitcher; pour it into each of the cups. Make sure to fill the cups, so that the water level reaches over the opening of the tubes.

6. Your tiltmeter is now ready for use. When it is level, the water level in the cups are the same. When it is tilt the water level changes as the water runs through the tubes from one cup to the other. Scientist uses the tiltometers to detect whether rocks layer are moving comparing the water levels in the two connected containers.
Try out the other sections
 Parents' Day
 Craft Ideas for Kids
 School Projects & Homework Help
 Hobbies
