The familiar image of a witch – dressed in ragged clothes with a broomstick and a warty face – developed from a much-feared folklore figure called the hag. Myths, from ancient Egypt through to pre-Christian Europe, tell of ugly old women who used supernatural power to bring misfortune to those around them. During medieval times, many innocent old women who looked like hags became the victims of witch hunts. They were tried and usually found guilty, then sentenced to burn alive at the stake.
METHOD
YOU WILL NEED
Black cotton fabric (79 x 43¼ in),
Ruler, white pencil, scissors, needle,
Black thread, newspaper, stiff paintbrush,
Silver paint, two sheets of thin black card (16½ x 23¼ in and
12½ x 12½in), Scotch tape, small piece of silver card, white glue and glue brush, green and black tissue paper.
STEP 1
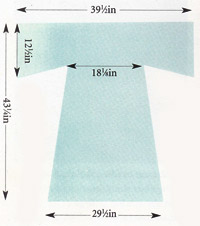
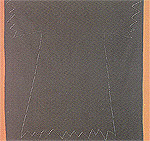
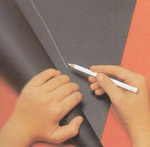
Fold the black fabric in half widthwise. Lay it out on a flat surface. Then use the template to draw the witch’s dress shape on to the fabric with a white pencil.
 STEP 2
Cut out the dress shape. Cut a slit 9½ in across in the middle of the folded edge for your neck. Then cut a second line 4½ in long down the back of the fabric.
 STEP 3
Turn the fabric inside out. Use a needle and some thread to sew a simple running stitch up each side of the witch’s dress. Then sew under the arms of the dress.
 STEP 4
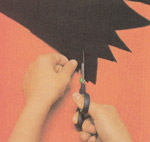
Cut a jagged edge along the cuffs of each sleeve and along the bottom of the dress. Turn the dress inside out so that the fabric is right side out and the stitches are hidden.
 STEP 5
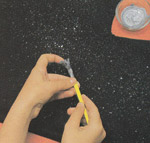
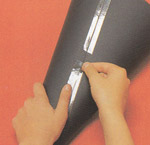
Lay the dress on a sheet of old newspaper. Dip a stiff brush in silver paint. Pull the bristles back towards you and spray paint onto the fabric. When dry, spray the other side.
 STEP 6
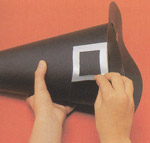
Roll the rectangle of thin, black card into the shape of a cone. Use a white pencil to draw a shape on the card to show where it overlaps and should be taped.
 STEP 7
Cut away the excess card and roll the card back into a cone shape. Then secure it with Scotch tape. Trim the bottom edge of the cone to fit the size of your head.
 STEP 8
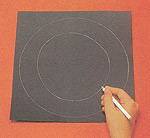
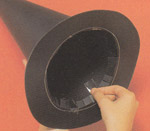
Place the hat on the square black card. Use the white pencil to draw a rough circle around the rim about 2in away from it. Draw a second circle to fit exactly around the rim of the hat.
 STEP 9
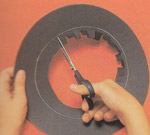
Cut around the outside ring. Then cut out the center, making sure to leave an extra 13/16in inside the white line ring. Make snips into the ring as far as the line to make small tabs.
 STEP 10
Fit the rim of the hat onto the bottom of the cone-shaped section. Fold the tabs up inside the hat and use small pieces of sticky tape to fix the rim to the hat.
 STEP 11
Draw a rectangular shape onto the silver card to make a hat buckle. Draw a second rectangle inside the first one. Cut out the buckle and glue it onto the front of the hat.
 STEP 12
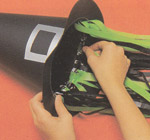
Cut sheets of green and black tissue into long strips to make witch’s hair. Glue the strips all the way around the inside of the witch’s hat, leaving a gap at the front by the buckle.
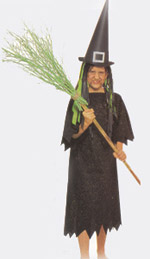
Complete the witch’s look by using face paints. Paint dark lines under your eyes and around your mouth to make you look as if you have wrinkles. Black out one of your teeth. You will also need a broom, which you can make by trying twigs to an old broom handle.
Back to School Projects Main

 Parents' Day
 Craft Ideas for Kids
 School Projects & Homework Help
 Hobbies
