When you make your model car, choose the colors carefully. Do you want bright colors that will be noticed easily, or cool, fashionable colors? Car manufacturers call in teams of people to help them decide what a car should look like. Stylists and design and production engineers join forces with the sales team to develop cars they hope people will buy. They think about the colors, how much people are prepared to pay, and what features they want, from air-conditioning to special car seats.
Before a new car is launched to the public, detailed models are made and tested for road handling, engine quality, and comfort.
MODEL CAR
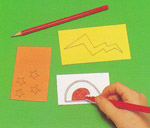
YOU WILL NEED
Two 8½ x 11in sheets of card, compass, ruler, pencil, scissors, white glue, glue brush, bradawl, 6in square piece of colored card, pliers, four paper clips, two 4in lengths of 5/8in diameter wood dowel, tape.
STEP 1
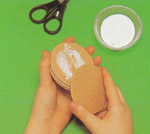
Draw and cut out four 1 in and eight 2½in diameter card circles. Glue the 2½in circles together to make four wheels. Glue a 1 in circle to the center of each wheel.
 STEP 2
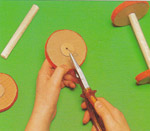
Use the bradawl to make a hole in the center of each wheel. Cut four 1/8 in strips of colored card. Wrap one each around the wheel rims. Glue the overlapping ends.
 STEP 3
Push straightened paper clips into the holes, and bend the outer ends with pliers. Fix the wheels to the two pieces of dowel by pushing the paper clips into the ends.
 STEP 4
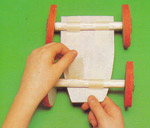
Cut a piece of card to 2¾ x 6in. trim one end to make it 2½in wide. Tape the two axles to the card, one at each end. Make sure they are long enough for the wheels to rotate freely.
 STEP 5
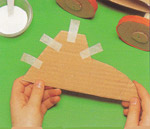
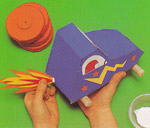
Cut a piece of card 3 ¼ x 6in. Double it over and bend it into a British cab shape. Tape the two loose ends together. Stick the base of the cab shape to the car base.
 STEP 6
Cut two cardboard shapes 6in long and 4in high. Trim them with the scissors to the same shape as the side of your car cab. Attach the sides to the cab with tape.
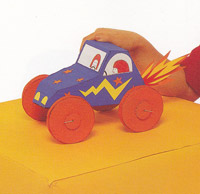
DECORATE YOUR CAR
YOU WILL NEED
Two colors of acrylic paints, medium paintbrushes, pencil, two pieces of 6 x 8in colored card, a piece of white card, two colors of felt-tipped pens, scissors, white glue.

STEP 1
Remove the wheels from your car. Paint the sides and top of the cab with one of the two colors of paint. Leave it to dry. Then paint it with the same color again, and leave it to dry.
 STEP 2
Draw exciting designs for the sides of the car and a driver to go behind the windscreen. Draw some head lamps and some exhaust fumes. Add color with the felt-tipped pens.
 STEP 3
Let the paint dry for a couple of hours. Cut the designs out of the card. Glue them to the sides and back of the car. Paint the wheels with the color of paint you haven’t used.
Replace the wheels when they are dry. Now your car looks just like a real vehicle. Cut photographs of cars from magazines to get ideas for new designs.
Back to School Projects Main

 Parents' Day
 Craft Ideas for Kids
 School Projects & Homework Help
 Hobbies
