The wind is moving air. Wind can move dust, sands and aother small items. The first experiment shows how the weight of particle affects how far it travels. The wind also causes changes in the weather. Meteorologist the wind to help them predict the changes. They uses the weather vane to find out its direction. The second projects shows how to make a simple weather vane. Wind speed is measured usign an anemometer. This device consists of a circle of cups that spin when the wind blows, like a windmill. The faster the wind blows, the faster the anemometer spins.
Name that dune:
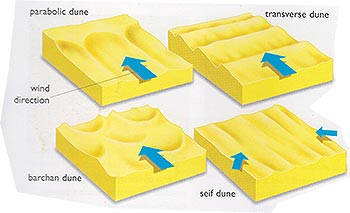 Some desert contain vast seas of sand, called ergs, where the wind piles sand up to dunes. The shape of the dunes depends on the amount of sand and changeability of the wind direction.
Cresent -shaped dunes, called parabolic dunes, are common on the coast. The ones with narrow points facing away from the wind are called barchans. These dunes creeps slowly forward. Tranverse dunes form at right angles to the main wind direction. Siefs occur where there is little sand, and the wind comes from different directions.
How wind sorts sand
You will need
Two empty ice cube trays,
Piece of card large enough to fit over an ice cube tray.
Spoon
Mix of fine and coarse sand,
hairdyer.
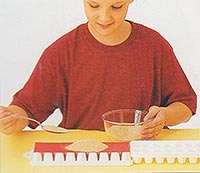
1. Turn one ice cube tray over, and lay it down end to end with another ice cube tray. Place the card over the upturned tray, and spoon the sand over it to make a sand dune .
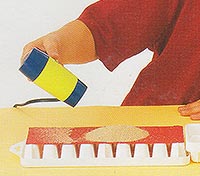
2. Hold a hairdyer close to the upturned tray, pointing it toward the other tray. Turn the hairdyer on, so that it blows sand into the open ice cube tray.
3. Look at the grains in the ach box. The distance a grain travels depends on its weight. Heavy grains fall in the end of the tray nearest to you. Light grains are blown to the farthest end.
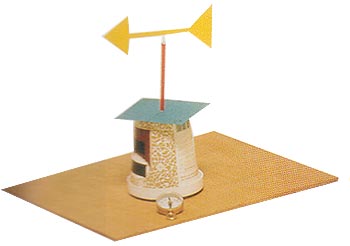
Make a weather vane
You will need:
Reusabe adhesive
Plastic pot and its lid
Scissors
Garden stick
Two pastic straws
Colored card
Pen
Tape
Pin
Plywood
Compass.
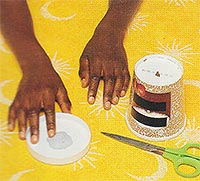
1. Stick a ball of reusable adhesive to the middle of the lid of the pot. Ask an adult to pierce a hole in the bottom of the pot with the scissors. Place the pot on the top of the lid.
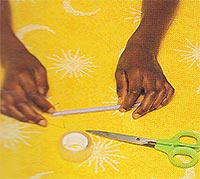
2. Slide the stick into one of the straws. Trim the end of the stick so that it is little shorter than the straw. Push the straw and stick through the hoe in the pot and into the adhesive.

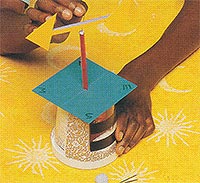
3.Cut out a square fo card. Mark each corner with a point of the compass-N, E, S, W. flod in half and snip a hole in the middle. Carefully slip the card over the straw.
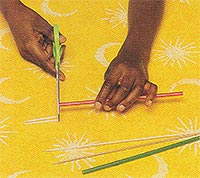
4. Cut out two card triangles. Stick them to each end of the second straw to form an arrow head and tail. Put a ball of reusable adhesive in the top of the first straw in the pot.
5.Push a pin through the middle of the arrow. Stick the pin into the the reusable adhesive in the first straw. Be careful not to prick your finger when you handle the pin.
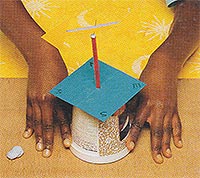
6. Attach weather vane toa plywood base using a piece of reusable adhesive. Test it for use -the arrow should spin around freely when you blow on it.
7. take your weather vane outside and use a compass to point it in the right direction. You acn discover the direction the wind blowing.
Back to School Projects Main

 Parents' Day
 Craft Ideas for Kids
 School Projects & Homework Help
 Hobbies
