Toy trains started to go on sale during the mid-1800s. Early models were made of brightly painted wood, and often had a wooden track to run along. Soon, metal trains went on scale, many of them made from tinplate. Some of these metal toy trains had wind-up, clockwork motors. Clockwork toy trains were first sold in the USA during the 1880s. The most sophisticated model trains were steam-powered, with tiny engines fired by methyl alcohol burners. Later models were powered by electric motors.
Railroad companies often devised special color schemes, called liveries, for their locomotives and carriages. Steam locomotives had brass and copper decoration, and some also carried the company’s logo or badge. Many toy trains are also painted in the livery of a real railroad company. The shape of the locomotive you can make in this project has an engine house that is typical of the real locomotives made in the 1930s. The driver controlled the speed of the train, and the fireman made sure there was a good supply of steam.
MAKE A TOY TRAIN
YOU WILL NEED
10¼ x 10¼in card, ruler, masking tape, scissors, 4 x 4in card, pencil, white glue and glue brush, stiff card for templates, paints, paintbrush, water pot, underframe from previous project, two thumb tacks, 4¼ x ½in red card, split pin.
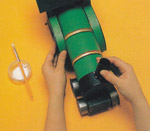
STEP 1
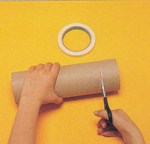
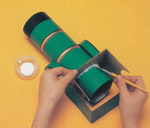
Roll the 10¼ x 10¼in card into an 3¼in diameter tube. Secure it with masking tape. Using the scissors carefully cut a 2½in slit, 8½in from one end of the tube.
 STEP 2
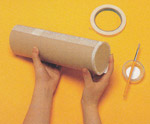
Hold the tube upright on the 4 x 4in piece of card. Draw around it. Cut this circle out. Glue the circle to the tube end farthest away from the slit. Tape to secure.
 STEP 3
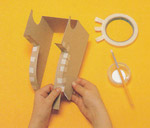
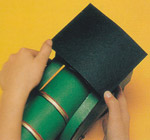
Copy and cut the templates. Fold template A along the dotted lines. Fold templates B upward along the dotted line. Glue both strips to the cabin as shown, and secure with tape.
 STEP 4
When the glue is dry, gently peel off masking tape. Now glue on template C as shown above. Hold it in place with masking tape until the glue dries, and then remove the tape.
 STEP 5
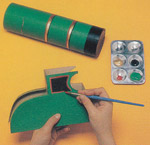
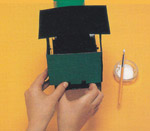
Apply two coats of green paint to the outside of the locomotive. Let the first coat dry before applying the second. Then paint the black parts. Add the red and gold last.
 STEP 6
Glue around the bottom edge of the cabin front C. Put a little glue over the slit in the tube. Fit the front of the cabin into the slit. Leave the locomotive to one side to dry.
 STEP 7
Give roof template D two coats of black paint. Let the paint dry between coats. Glue the top edges of the cabin, and place the black roof on top. Leave until dry and firm.
 STEP 8
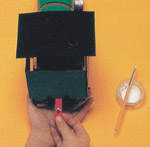
Glue the bottom of the cylindrical part of the train to the underframe you made in the "Underframe" project. Press thumb tacks into the back of the cabin and underframe.
 STEP 9
Glue both sides of one end of the red strip. Slot this between the underframe and the cabin, between the thumb tacks. When it is firm, fold the strip and insert the split pin.
 STEP 10
Paint one side of template E black. When it is dry, roll it into a tube and secure with masking tape. Glue the wavy edge and secure it to the front of the locomotive as shown.
Just like a real locomotive, the basic color of your model train has been painted with red, black and gold decoration. The locomotive is now ready to run on the railway line you made in the "Making tracks" project.

Back to School Projects Main

 Parents' Day
 Craft Ideas for Kids
 School Projects & Homework Help
 Hobbies
